☐ AWS account with billing enabled (free tier is fine)
☐ Key pair created and .pem file downloaded to your machine
☐ Security group that allows SSH (port 22) from your IP
☐ Region selected — top-right corner of the console, pick the one nearest you
☐ Terminal app ready (Terminal on Mac/Linux, PowerShell or WSL on Windows)
⚡ If any of these are unchecked, handle them first. The tutorial assumes all five are done.
The end state: one t2.micro running Amazon Linux or Ubuntu, with Nginx responding on port 80, and you able to SSH in from your local terminal. That's the entire scope.
Step 1: Launch the Instance
- Open the AWS console, type EC2 in the search bar, click the result
- Hit the orange Launch Instance button
Name and Tags
Type something descriptive: nginx-test works. Tags are metadata attached to the resource — useful later, optional now.
Choose an AMI (Operating System)
AMI = Amazon Machine Image. It's the OS that boots on your instance. You'll see a wall of options — ignore most of them. The two that matter: Amazon Linux 2023 (uses dnf, comes with the AWS CLI baked in) and Ubuntu Server 22.04 LTS (uses apt, massive community support outside AWS).
I always pick Ubuntu over Amazon Linux. Amazon Linux is fine but the community docs are thinner and half the Stack Overflow answers assume Ubuntu. When something breaks at 2 AM, I want the answer on the first Google result, not the third. The rest of this tutorial covers both, so pick what you know — but if you have no preference, go Ubuntu.
Instance Type
Instance type controls CPU and RAM. For a tutorial Nginx box, t2.micro (1 vCPU, 1 GB) or t3.micro (2 vCPUs, 1 GB) both work. Both are free tier eligible, and the free tier gives you 750 hours/month — exactly one instance running non-stop for 31 days.
My take: t3.micro is worth the extra few cents — the burstable credits last longer and you won't hit CPU throttling as fast. The networking is also slightly better. For this tutorial it genuinely does not matter, but if the instance might stick around for a side project later, start with t3.
Key Pair (SSH Access)
EC2 uses asymmetric key authentication. AWS holds the public half; you download the private half as a .pem file.
- Click Create new key pair
- Name:
my-aws-key - Type: RSA, Format: .pem (select .ppk instead if you plan to use PuTTY)
- Click Create — the file downloads once, right now, and cannot be re-downloaded
Move it somewhere permanent immediately:
mv ~/Downloads/my-aws-key.pem ~/.ssh/
chmod 400 ~/.ssh/my-aws-key.pem
The chmod 400 is not optional. SSH will refuse to connect if the key has group or other read permissions, and the error message doesn't tell you why — it just says "Permission denied (publickey)" and you spend 20 minutes checking the wrong things. I've been bitten by this more than once after downloading a fresh key. Make it a reflex: download the key, move it, chmod 400, done.
Network Settings (Security Group)
This is the part that matters most and the part people rush through. A security group is a stateful firewall that sits in front of your instance. Every inbound packet gets checked against these rules before it touches the OS. No matching rule, no connection — the packet just disappears silently.
Click Edit next to Network settings, then Create security group. You need three inbound rules:
- SSH (port 22) — set source to My IP. This locks SSH access to your current public address.
- HTTP (port 80) — source: Anywhere (
0.0.0.0/0). Nginx needs this. - HTTPS (port 443) — source: Anywhere. Not strictly needed yet, but add it now so you don't have to come back when you set up TLS later.
The critical line is the SSH rule. I once opened port 22 to 0.0.0.0/0 on a test instance and had 3,000 SSH brute-force attempts within an hour. I only noticed because I'd installed Fail2Ban and the ban log was enormous. The bots are automated and relentless — they scan every new public IP within minutes of it going live. Always restrict SSH to My IP.
One gotcha: "My IP" means your public IP right now. If you're on a coffee shop Wi-Fi and go home, your IP changes and SSH will time out. You'll need to go back to the console and update the security group rule with your new IP. It's a two-click fix but confusing the first time it happens.
The result of this configuration: only your specific IP address can reach port 22. The entire internet can reach ports 80 and 443. Outbound traffic is unrestricted by default (your instance can reach the internet for package installs, API calls, etc.).
Storage
Leave it at the default 8 GB gp3. Nginx and a static page won't use even 1 GB of that.
Launch!
Click Launch instance. AWS provisions it in roughly 30 seconds. Refresh the instances list until the state column reads "Running" and the status check column shows "2/2 checks passed."
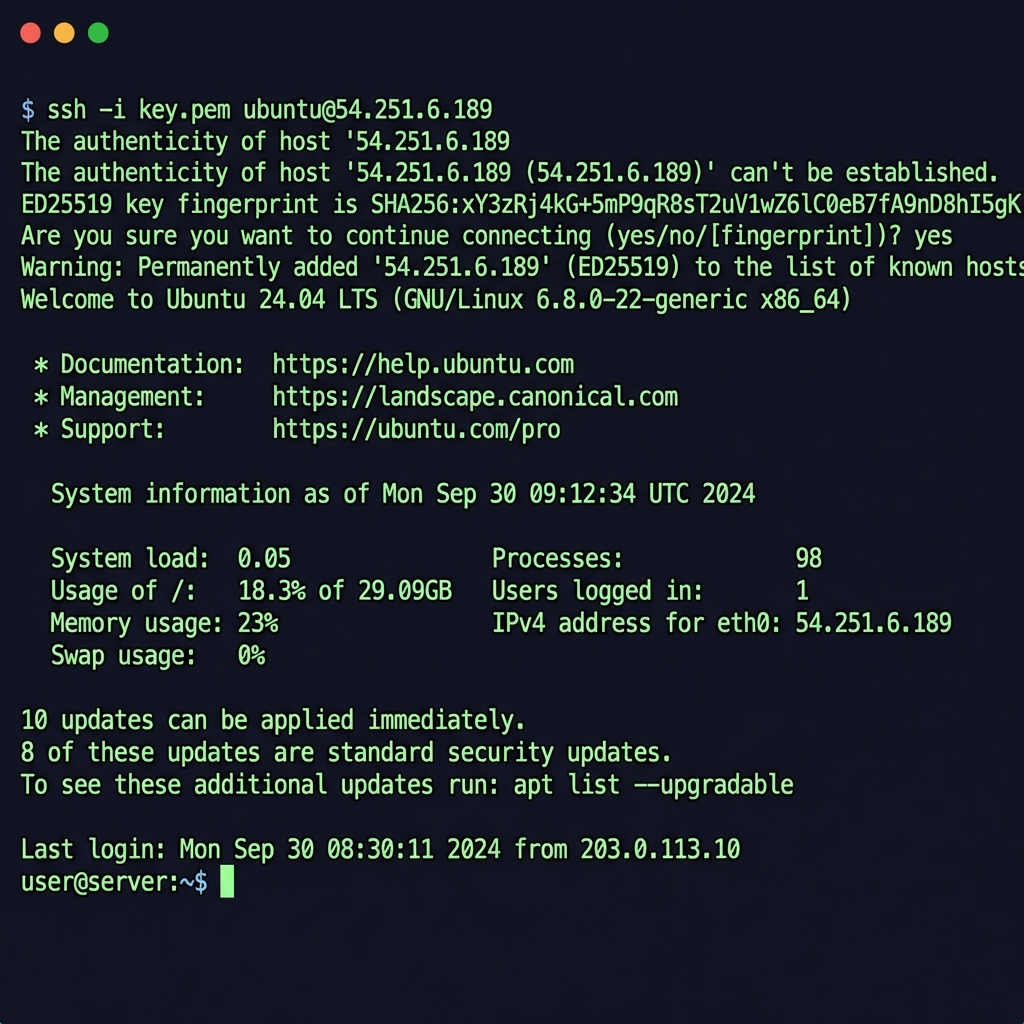
Step 2: Connect via SSH
Grab the Public IPv4 address from the instance details panel in the console — something like 54.123.45.67.
Linux/Mac
ssh -i ~/.ssh/my-aws-key.pem [email protected]
Swap ec2-user for ubuntu if you picked the Ubuntu AMI (Debian uses admin). SSH will ask you to confirm the host fingerprint the first time — type yes and you'll land at a shell prompt.
Windows
Windows 10/11 ships with OpenSSH in PowerShell. The same ssh -i command works there. Alternatively, install WSL and use the Linux instructions above.
If you prefer a GUI, PuTTY works too:
- Convert the .pem to .ppk with PuTTYgen
- Open PuTTY, paste the public IP into the Host Name field
- Navigate to Connection → SSH → Auth → Credentials
- Browse to the .ppk file
- Click Open
If SSH Hangs or Times Out
Nine times out of ten this is the security group. Go back to the console, open the security group attached to the instance, and check that the port 22 inbound rule lists your current public IP — not the IP you had when you created the rule yesterday on a different network. If the IP is right, confirm the instance is in a public subnet with an internet gateway and that it actually has a public IPv4 address assigned (check the details panel — sometimes auto-assign public IP gets toggled off).
Step 3: Install a Web Server
With a shell open on the instance, install Nginx so there is something to see on port 80.
Amazon Linux 2023
# Update packages
sudo dnf update -y

# Install Nginx
sudo dnf install nginx -y

# Start and enable
sudo systemctl start nginx
sudo systemctl enable nginx
💡 Note: If dnf install hangs or times out, confirm the instance has outbound internet access. Default VPC setups include this, but custom VPCs may not.
Ubuntu
# Update packages
sudo apt update && sudo apt upgrade -y

# Install Nginx
sudo apt install nginx -y

# It starts automatically on Ubuntu
Test It
Open a browser and go to http://54.123.45.67 (your instance's public IP). You should see the Nginx welcome page. If it loads, everything works — instance, security group, web server, all of it.
Step 4: Don't Get Hacked
What you have so far works for a quick test. If the instance stays up more than a few hours, tighten things up.
Update the System Regularly
Run sudo dnf update -y (Amazon Linux) or sudo apt upgrade -y (Ubuntu) at least weekly. Unpatched packages are how most EC2 instances get compromised — not clever zero-days, just stale software with known CVEs sitting on a public IP.
Check Your Security Group
Go to your instance in the console, click the Security tab, click the security group link. The SSH rule source should be your IP, not 0.0.0.0/0. If it says 0.0.0.0/0, fix it now — that means every IP on the internet can attempt SSH connections.
Install Fail2Ban
# Amazon Linux
sudo dnf install fail2ban -y
sudo systemctl enable fail2ban
sudo systemctl start fail2ban

# Ubuntu
sudo apt install fail2ban -y
Fail2Ban watches auth logs and temporarily bans IPs after repeated failed login attempts. Automated scanners will find your SSH port within minutes of launch — Fail2Ban keeps them from hammering it indefinitely.
Use SSH Keys Only (Already Done)
EC2 instances ship with password authentication disabled in sshd_config. Key-only auth is already the default. Don't change it.
How Much Will This Cost?
If your AWS account is less than 12 months old, the free tier covers 750 hours/month of t2.micro or t3.micro, 30 GB of EBS storage, and 15 GB/month of outbound data transfer. One instance running 24/7 uses about 730 hours — fits inside the free tier with room to spare. After the 12-month window closes, expect roughly $8.50/month for a t2.micro running non-stop in us-east-1. Stopping the instance kills compute charges but you still pay for the EBS volume (~$0.08/GB/month for gp3).
Stopping vs Terminating
People mix these up constantly. Stop powers down the VM but keeps the EBS volume — you pay for storage only, and restarting later assigns a new public IP (unless you attach an Elastic IP). Terminate deletes everything: instance, root volume, gone forever. For this tutorial, terminate when you're done. There's nothing on the instance worth keeping.
Common Issues
"Permission denied (publickey)"
Three possible causes: you specified the wrong .pem file, you used the wrong username for the AMI, or the key file permissions are not restrictive enough. Run chmod 400 on the key and double-check the username (ec2-user for Amazon Linux, ubuntu for Ubuntu).
"Connection timed out"
Either the security group does not have an inbound rule for port 22 from your IP, or the instance sits in a private subnet without a route to the internet gateway.
Can't access the website
Verify the security group has an inbound rule for HTTP on port 80 with source 0.0.0.0/0. Then confirm Nginx is actually running: sudo systemctl status nginx. If the service is inactive, start it with sudo systemctl start nginx.
Forgot key pair
AWS cannot regenerate a lost private key. You can recover access the hard way — stop the instance, detach its root volume, attach it to a second instance, edit ~/.ssh/authorized_keys on the mounted volume, reattach, and restart. For a tutorial instance, just terminate it and launch a new one with a fresh key pair. Takes five minutes.
What's Happening
The full picture, end to end:
Internet
 ↓
Security Group (firewall - port 22, 80, 443)
 ↓
EC2 Instance (virtual machine)
 └── Amazon Linux / Ubuntu
 └── Nginx web server
 └── Your key-based SSH access
Every inbound packet passes through the security group first. Only traffic matching an explicit allow rule reaches the instance. We opened three ports: 22 for SSH, 80 for HTTP, and 443 for HTTPS.
Making It More Interesting
Once the Nginx welcome page loads, you have a working server. Some things worth doing next, all on the same instance:
- Serve your own HTML — drop files into
/usr/share/nginx/html/ - Add HTTPS — install Certbot and request a Let's Encrypt certificate
- Run an application server — Node.js, Python, Go, whatever your project uses
- Attach a database — PostgreSQL or MariaDB installed locally, or connect to RDS
EC2 vs Serverless
EC2 gives you a full VM — you own the OS, the runtime, and the network config. That means you also own the patching, the monitoring, and the capacity planning. Use EC2 for long-running daemons, WebSocket servers, databases, or anything that needs specific kernel modules. Use Lambda when the workload is short-lived request handlers or event-driven glue code and you don't want to think about servers at all. This tutorial only covers EC2.
Cleanup
When you are done:
aws ec2 terminate-instances --instance-ids i-xxxxx
💬 Comments